
The Why Of It
A rustic French feast for a cold January night.


I’ve spent a lot of time over the past few years thinking about what to cook. Between our household meals, and this newsletter, and my work on The Chicken Thigh Guy, there’s a lot of “what should I cook today for …” going on in my head. Over the past few weeks, I’ve been thinking about it a little differently.
I’ve been thinking a lot about why I cook.
I cook because it’s instant gratification. Meals and recipes are projects and puzzles that I can undertake in an afternoon and instead of spending hours looking for pieces the dog stole, have a delicious meal or snack or dessert at the end.
I cook because it’s something I’m pretty good at. This isn’t a boast, it’s that doing things we’re good at, doing things well, or well enough, brings us joy and pride. Sure. Doing things that are hard brings us joy and pride as well, perhaps in greater measure – but in the face of everyday defeats – no matter how minor - small victories are important.
Mostly though, I cook to share. To share a meal with old friends and new family. To share and explore flavors and techniques from other traditions. To make something to share with others. Even if it’s just the two of us on a dark winter weeknight. That give me joy. Small measures, but joy nonetheless.
So, for this week, and a few of the next few editions, I’m sharing some dishes and techniques that I love. That bring me joy – and not in that “hold this and ask if it brings you” closet cleaning sort of joy – though there are some recipes this week that I fetched from the metaphorical closet. Just “hey, try this. It makes me happy.”
This week’s menu is heavily French. If you’re a regular reader, you know I love French food. I love the French love of food, the purity of technique, and that tightrope balance of rustic and fussy, classic and nouvelle. And on a dark cold winter weeknight, I love the smell of a rich stew simmering, that fresh bread smell lingering, and knowing that at the end of what might be a hard day, there’s something wonderful waiting.
Welcome to all my new subscribers, and a special thanks to those who’ve chosen to become paid subscribers. The Weekly Menu is free, but paid subscribers both help to support my work here, and get ocasional extras such as additional recipes, commentary, a an every-once-in-a-while ladle full of snarky tips and tricks. You can become a paid supporter for as little as $4 a month and get 20% for a whole year.
Another German Village Baguette
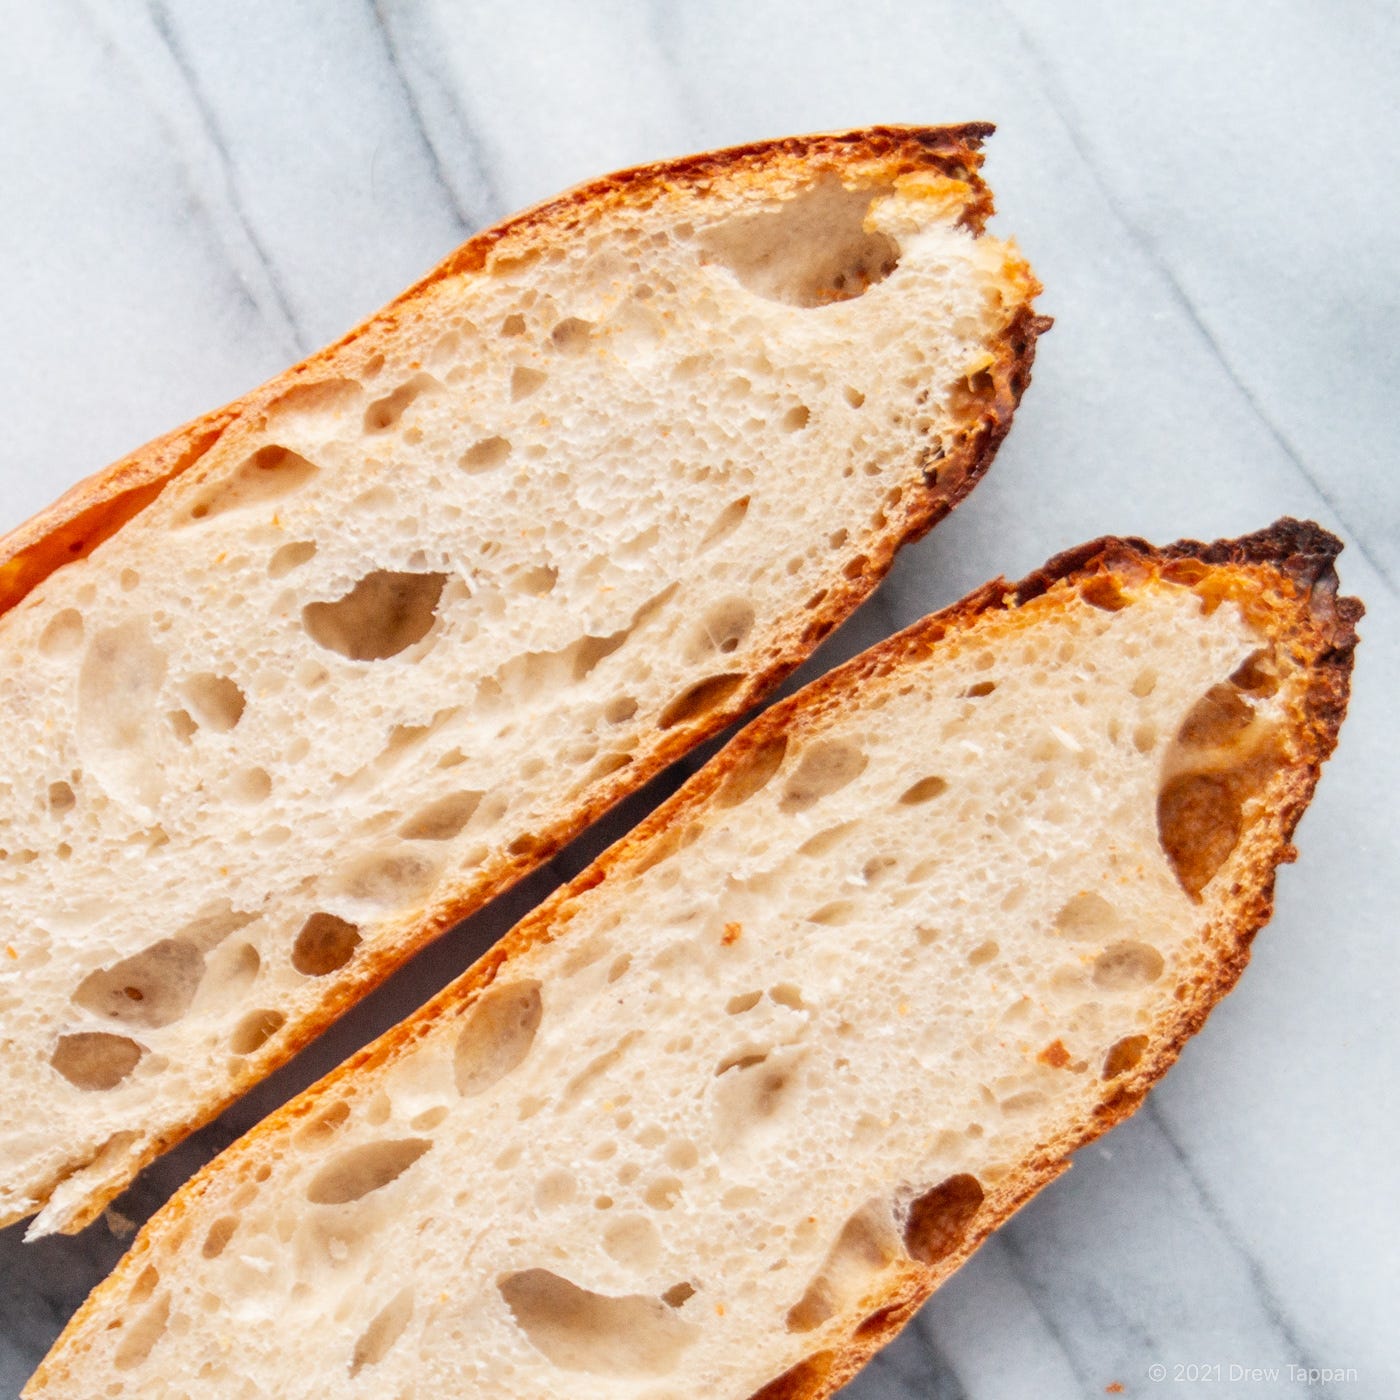
I thought about including new bread recipe with this week’s menu, this being the perfect time of the year to hide yourself away in the kitchen snuggled up to a warm oven meditatively mixing, kneading and shaping a hunk of nearly living dough. It’s still the perfect time of year, but the perfect bread for this week’s menu is one that I’ve already shared with you – my go-to baguette recipe.
As I mentioned in its original appearance, this is a little more involved bread recipe than some of the other breads I’ve included in this newsletter. But, something else I mentioned then, and will reprise because it’s still true:
Even ugly misshapen fresh homemade bread tastes great. Seriously. It doesn’t have to look like your friend’s neighbor’s college roommate’s Instagram influencer’s perfectly lit loaf to do a great job of soaking up the sauce. Have at it. If you’re struggling, google and YouTube and probably that friend’s neighbor’s college roommate’s Instagram influencer have tips and tricks that will help.
475 g Bread Flour
300 g filtered water
100 g 100% hydration sourdough starter
-or-
50 g water, 47 g bread flour, and 3 g yeast
11 g kosher salt
If using yeast, mix 50 g water, 47 g bread flour, and 3g yeast in a bowl. Allow to rest for ten minutes. Call this your starter. Proceed as below.
Measure out 50 g of starter.
Add 300 g water to the bowl of a mixer fitted with a paddle attachment.
Add 50 g starter to the water and stir to dissolve.
Add 300 g of the bread flour to the water and mix on low speed until completely combined.
Transfer to a covered container and allow to ferment at least 8 hours and up to 24 hours.
The next day, probably, unless you’re up all-night baking like some people I know who are definitely not. No really.
Transfer the dough to the bowl of the mixer.
Add the remaining 175 g flour and 11 g of salt.
Process with a dough hook until a smooth dough has formed.
Allow to rise in a warm place until doubled in size – about 2 – 2 ½ hours.
Removed from the container and stretch into a large rectangle.
Letter fold into thirds.
Repeat until you can no longer stretch the dough without tearing – usually 2-3 turns.
Return to covered container and rest for 30 minutes.
Repeat the stretching and resting 2 more times for a total of ~90 minutes – plus whatever time it takes you to stretch the dough.
After the last stretch and fold, allow to rest for 10 minutes on the counter.
Divide into 3 even pieces.
Shape into baguettes (see instructions here)
Preheat your oven to 425°F.
Allow to proof supported by a basket, a couche, or a well-floured towel for 35-40 minutes or until a finger pressed into the dough leaves a mark but still bounces back a little.
Sprinkle or spray your loaves with water.
Holding a knife or a bread lame at a 30° angle, slash 3-5 cuts into the loaves – at the center and just barely off the centerline of the loaf.
Bake at 425°F for 40 minutes or until dark and crusty.
Salad Lyonnaise (Another Reprise)

This is my take on a classic Salad Lyonnaise – and like the bread above it’s a reprise from a past newsletter both because I’m all about recycling, and because it’s a great match for the classic French stew you’ll find below.
There’s nothing complex about it. A very simple acidic dressing contrasts rich bacon. And, a poached egg – when pierced – drenches the whole thing with rich, runny yolk. That, in turn, perfectly tames the assertive bitterness of the greens and leaves you with a salad that could be a meal on its own.
Serves 4
Time 20 minutes, 15 active
1 head leafy chicory (frisée, escarole, etc.)
4 pieces thick cut bacon
4 large eggs
1 small shallot
2 tbsp olive oil
2 tsp red wine, sherry, or champagne vinegar
1 tsp smooth Dijon mustard
1/8 tsp anchovy paste
½ tsp fresh ground black pepper
½ tsp kosher salt
Poach and shock the eggs. Cook until the white is set but the yolk is still liquid.
Slice the bacon crosswise into thin pieces. Cook over medium heat until browned well, reserving the bacon fat for other uses.
Wash and chop the greens into 2-inch pieces.
Peel, trim, and finely mince the shallot.
Add shallot, salt, anchovy paste, and vinegar to a non-reactive bowl and stir to combine well. Allow to sit 10-15 minutes for the vinegar to mellow the shallot.
Add the mustard to the vinegar/shallot mixture. Mix well.
Slowly add the oil, while whisking, to create a smooth emulsion. If necessary, add a few drops of cold water. This can help create an emulsion.
To serve, gently warm the eggs in tap warm water for 10 minutes. Toss the greens well with the dressing and scatter with bacon pieces. Arrange on a plate and top with a warm poached egg. Serve immediately.
Gnocchi Parisienne
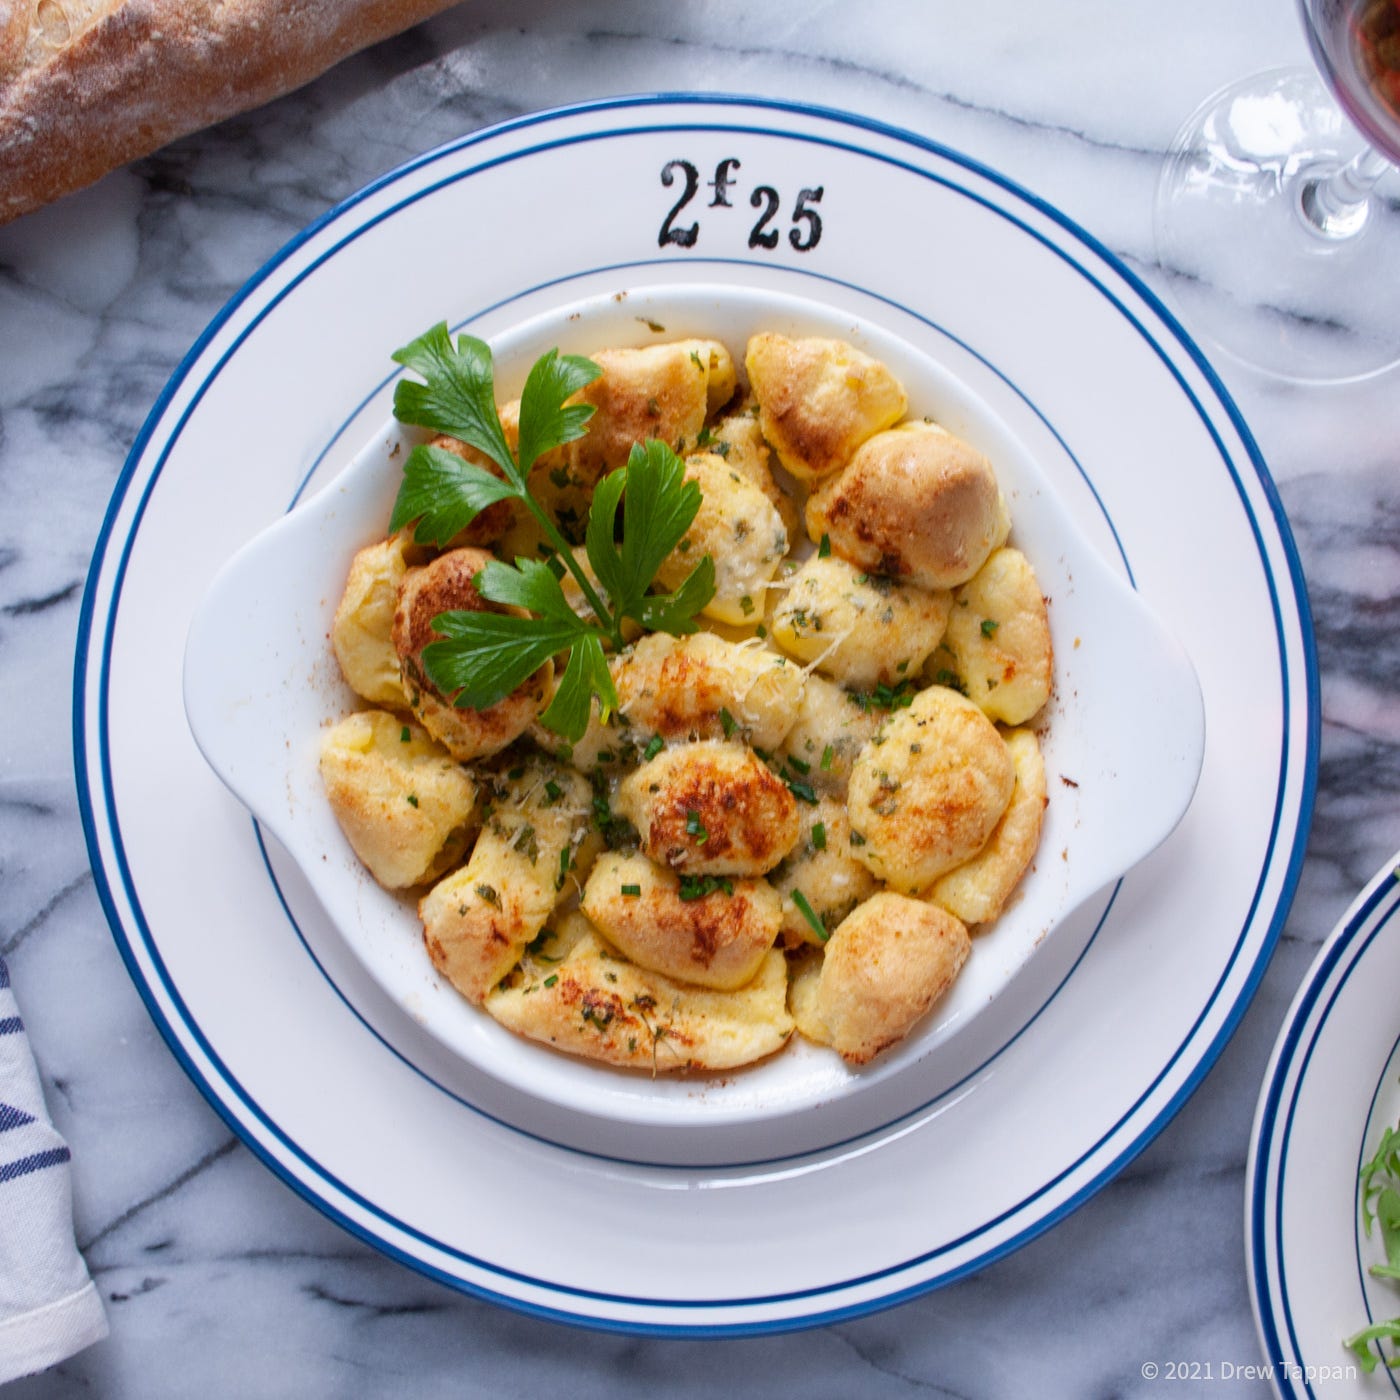
This isn’t the gnocchi you’re used to, but it just may be the Gnocchi you’re looking for. Gnocchi Parisienne isn’t made with potatoes and isn’t heavy. In fact, they’re wildly light and puffy, crisp and … well essentially the opposite of the dough store bought potato gnocchi you’re probably used to.
That’s in large part because instead of being made with a potato fortified pasta dough, Gnocchi Parisienne are made with Choux dough – the same pastry concoction used to make eclairs and cream puffs – though not sweetened in this use. The choux is piped into boiling water, then the resulting little pillows of dough are doused in butter, cheese, and crisped in the oven.
The result is a light, crisp, cheesy, slightly eggy dish that’s a great side or even a snack, and that’s rich and delicious without being heavy.
1 recipe Choux Pastry (below)
½ cup shredded comté or gruyere
2 tbsp unsalted butter
1 clove garlic
minced parsley as garnish
Preheat your oven to 400°F.
Peel, trim, and crush or microplane the garlic.
Melt the butter.
Add the crushed garlic to the melted butter and keep in a warm place.
Prepare a large pot of lightly salted boiling water.
Place the choux pastry in a pastry bag fitted with a simple round tip – or in a large ziplock bag with the corner cut off.
Using a table knife to cut them, pipe ½ inch long portions of choux into the boiling water. You may have to work in batches.
Cook until all the pieces are floating and have puffed slightly.
Drain, and ladle into oven safe gratin pans or other similar dishes.
Top each serving with a little garlic butter and some shredded cheese, then bake until lightly browned and crisp at the edges.
Serve immediately.
Choux Pastry
1 cup water
6 tbsp unsalted butter
1 cup flour
4 large eggs
Place the water and butter in a thick bottomed pan over medium heat.
As soon as the water boils and the butter is completely melted, add the flour to the pan and stir vigorously.
Keep stirring - with the heat on - until a smooth, glossy ball forms and pulls away from the pan.
Remove from the heat, transfer to the bowl of a stand mixer fitted with a paddle attachment, and allow to cool to about the temperature of tap water. You can speed this process up by mixing on low.
Once the dough is cooled enough not to cook the eggs, bring the mixer to medium speed, and add the eggs one at a time, letting each egg fully incorporate before adding the next.
Beat until the eggs are fully incorporated and a smooth pastry is formed.
Pot-au-Feu
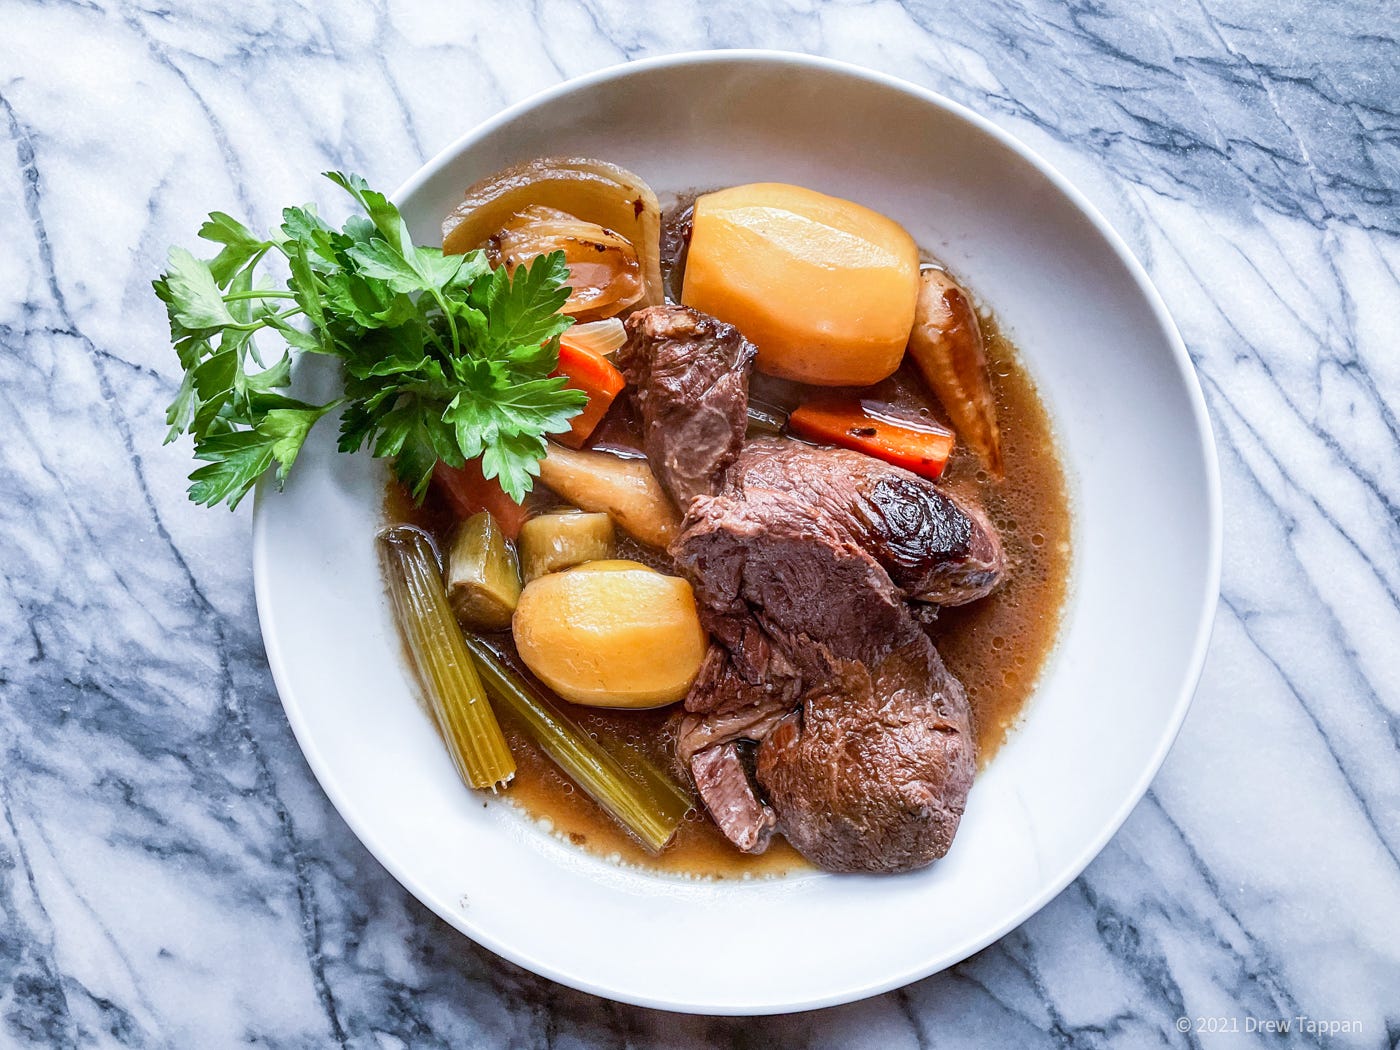
What bourguignon is to beef stew, Pot-au-Feu is to pot roast.
Like beef bourguignon (which I will never ever learn to spell properly – like seriously, I have to rely on google every time), Pot-au-Feu is one of the keystones of classic French cuisine. It’s a rustic classic. So rustic, in fact, that it’s essentially pot roast. No, that’s not true. It’s not essentially pot roast. It is pot roast. Really good, somewhat refined, rather extremely frenchified … pot roast.
Essentially, cuts of inexpensive beef are slow cooked in flavorful broth along with a bunch of aromatics. Then veg is added, and it’s a stew. That’s it. Of course, because this is French cooking there’s added messing about with technique, some slightly unusual ingredients, and there are multiple ways to serve it an … you get the point.

One of the key ingredients in a good Pot-au-Feu is bone marrow. Specifically, marrow that’s still in the bone. It adds richness and depth to the broth, and helps keep the meat luxuriant and moist – instead of dry and chewy. Marrow bones are easier to come by these days than they were when I first learned to cook this dish – but in these cold winter days of the long pandemic, I can’t (or really won’t) walk up to the butcher counter and have them cut to order. That led to a couple of interesting adventures with recipe testing this week. Every week I learn something new. This week I learned that using a Dremel tool as a culinary bone saw ends up with nasty meat bits all over your ceiling and a marrow bone only half cut when the tool overheats. There was also an incident with a chipped knife blade. Anyway, that’s also the story of why – while it’s called for in the following recipe – you don’t see a lovely little marrow bone nestled into the broth in the above photo. I cooked with it – but the Flintstone sized hunks of cow that came in my grocery delivery just plain and simple didn’t fit into the bowl. You win some, you lose some, you get some on the wall. That’s the way of life, I suppose.
1 ½ lb chuck roast
6 2-inch long Beef Marrow Bones
4 cups beef stock
2 cups white wine
8 medium carrots
8 stalks celery
8 small parsnips
1 large white onions
1 large leek
8 small yellow potatoes
1 large shallot
4 sprigs fresh thyme
1 sprig rosemary
handful of parsley
2 bay leaves
4 whole cloves
½ tsp fresh ground black pepper
1 tsp Kosher salt plus more to taste
Preheat your oven to 300°F.
Peel, trim, and half the onion.
Peel, trim and half the shallot.
Clean and peel the carrots and parsnips.
Trim and clean the celery.
Peel the potatoes and place them in cold water to keep them from discoloring.
Separate the white and green parts of the leek.
Push the cloves into ½ of an onion.
Make a bouquet garni by sandwiching the bay leaves, thyme, parsley and rosemary between 4 6-inch pieces of leek green, and tying it into a bundle using kitchen twine.
Slice the chuck roast across the grain into ~3/4 inch – 1-inch-thick slices. Do not trim off the excess fat.
Season the beef well with salt and pepper.
Place the shallot, 4 celery stalks, 4 carrots, 4 parsnips, the clove spiked half onion, and the bouquet garni into a Dutch oven.
Add the sliced chuck and 2 of the marrow bones.
Add the wine and beef stock, arrange so that most of the ingredients are mostly covered (the meats and vegetables will lose moisture to the stock as they cook), and bring to a low simmer.
Cover, and transfer to the oven to cook for 2 ½ hours.
Remove the dutch oven from the oven and uncover.
Carefully remove the beef and set it aside.
Remove and discard all the solids from the broth.
Cut the reserved celery, parsnips, leek whites, and carrots into bite sized pieces.
Quarter the remaining half onion
Return the beef to the pot and add the reserved carrots, parsnips, celery, onion, and potatoes to the broth.
Add the 4 remaining marrow bones.
Return to the oven and cook for an additional 1 hour to 90-minutes, or until all the vegetables and potatoes are tender.
Taste for seasoning and add additional salt and pepper as needed.
To serve, arrange 1 marrow bone per serving in a bowl along with a portion of beef, a potato, and each vegetable. Ladle a generous portion of broth over the meat and vegetables. Garnish with parsley.
Galette des Roi
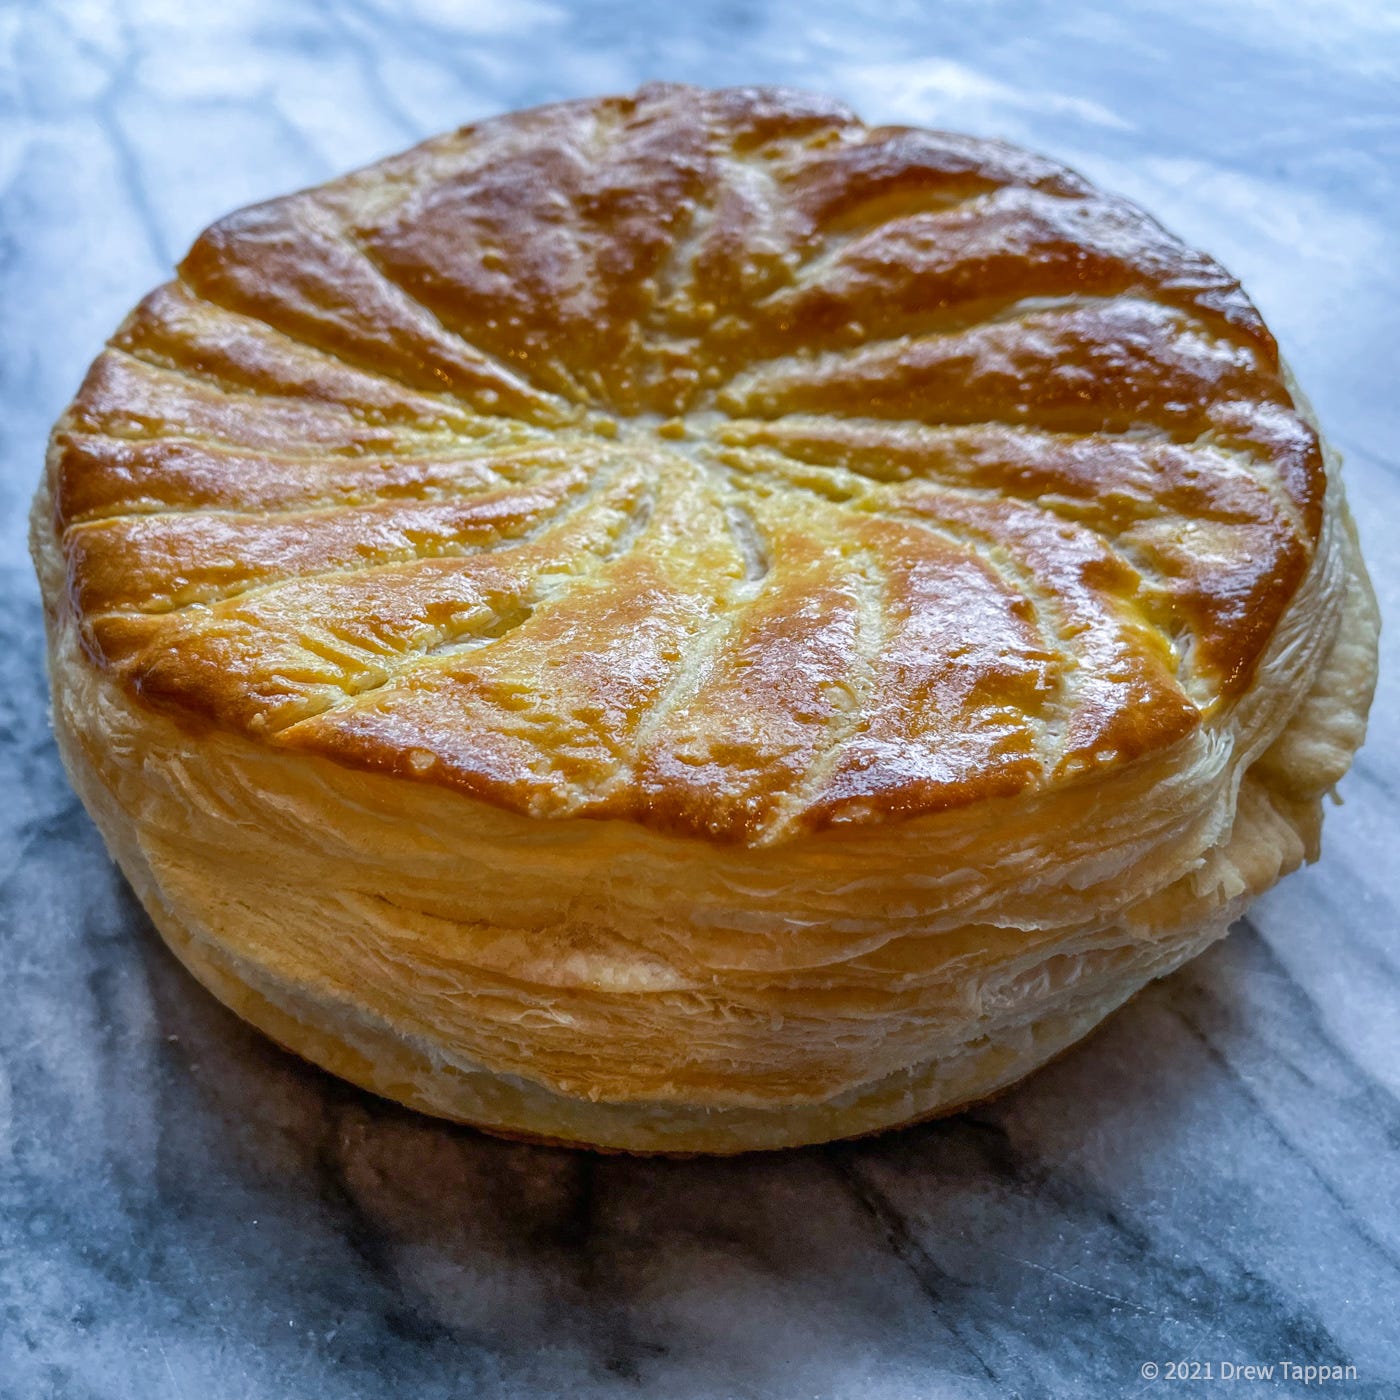
Galette des Roi is king cake. Not the overly frosted coated with sparkles oven baked donut of Mardi-Gras fame, but something arising from the same tradition. The New Orleans style king cake evolved from the southern French brioche style Galette des Roi baked for Epiphany - King’s Day. This Galette des Roi is the more northern style – a puff pastry crust with a frangipane (almond paste custard) filling.
Traditionally both styles included a little prize – a small ceramic baby or a bean – and whomever found it got to wear a paper crown and probably issue edicts on the behavior of the nobility or whether or not to invade Austria in the coming winter. As I understand it, this is how diplomacy has always worked. Cake, beans, French … etc.
There are two truly great things about this dessert. First of all, it’s delicious. Sweet almond filling and a spectacularly puffy layered unsweet crust are a perfect match. Secondly, it’s actually staggeringly easy to make if you take a few short cuts. I’ve included a recipe for homemade puff pastry, but you can use frozen commercial puff pastry. The homemade stuff tastes a little better, and I find making it fun – but it involves a lot of rolling and folding and if that’s not your thing, the commercial stuff is almost as good.
1 recipe puff pastry (below) or 2 sheets commercial puff pastry
1 recipe frangipane filling (below)
1 egg yolk
Preheat your oven to 400°f.
Roll out your puff pastry, and cut into two disks – how large you want to make them is up to you. I use an 8 inch ring mold as a guide.
Wet the edge of the pastry, and spread a generous amount of the filling in the center – making sure to leave at least an inch for the pastry to seal.
Top with the second disk and press to seal.
Beat the egg yolk with 1 tsp water.
Brush the top of the cake – being careful not to drip down the sides – with the egg yolk.
Allow the yolk to dry for five minutes, then cut 4 small cuts through the pastry into the filling as steam vents.
Use the point of a sharp knife, or a razor to cut very shallow decorative slashes into the egg washed pastry (being careful not to cut too deep)
Bake at 400°F until browned and puffed.
Serve at room temperature.
Puff Pastry
2 cups AP flour
1/2 cup water
pinch of salt
8 tbsp unsalted butter (1 stick)
Add the flour water, and salt to the bowl of a stand mixer fitted with a bread hook.
Process until a smooth dough has formed.
Smash the dough into a disk, and refrigerate for 30 minutes before continuing.
Cut two 10x10 inch pieces of parchment paper.
Cut a stick of butter into 4 long bars.
Arrange the bars together at the center of one of the pieces of parchment.
Top the butter with the other piece of parchment and pound and roll the butter until you have an even 8x8 inch square.
Fold over the edges of the parchment, and refrigerate the butter block for 15 minutes.
Remove the dough form the refrigerator.
Roll out into a rectangle approximately 10x12 inch.
Retrieve the butter, and center on the dough.
Stretch the edges of the dough and fold over the butter, pinching them closed.
Gently roll the dough and butter into a long rectangle.
Letter fold the rectangle, wrap in plastic and refrigerate for 20 minutes.
Remove from the refrigerator, roll out into a long rectangle, and perform another letter fold.
Repeat two additional times – refrigerating 20 minutes between each “turn.”
Roll out to ¼ inch thick before using.
Frangipane Filling
½ cup almond flour
1/4 cup granulated sugar
1 large egg
4 tbsp butter cut into small cubes.
1 tsp cornstarch
2 drops almond extract
Add all ingredients to the bowl of a food processor and process until smooth.
Refrigerate for 30 minutes prior to use (this will thicken the paste and make it easier to use.)