
Tiny T
A not very big dinner for a very big holiday.

I started this newsletter in September of 2020. That means this is the third Thanksgivingish menu I’ve shared. Next year I’m just making tacos.
I love Thanksgiving. By that I mean that I love the food. The everything else seems like a lot of fuss and stress and work, but I genuinely enjoy a huge plate of sweet savory meaty green gravy covered goodness.
But here’s the thing. It’s sort of hard to come up with something new when the classics are … the classics. So maybe this is my last even semi-traditional Thanksgivingish menu. Next year it’s turkey tamales with cranberry mole or sweet potatoes sushi or something. Maybe even just a hot dog. That cranberry mustard counts as festive, right?
Meanwhile, this weeks menu is a sort of almost traditional Thanksgiving meal, with a few twists and turns, sure … but it’s recognizable as Thanksgiving. It’s tuned and tweaked for a smaller gathering - a tiny tidy not-so-over-the-top Thanksgiving. It’s also just a little bit Italian American in influence, because why not?
This will be my last newsletter for a couple weeks. I’ll be pausing subscriptions, and taking a much needed vacation, spending a decided not-tiny holiday with a bunch of my family, and then be back with ideas for the next round of rapidly encroaching holiday meals. See y’all on the other side.
Shredded Brussels Sprout Salad with Bacon and Pecans

I’ve gone on at great length about brussels sprouts in this newsletter so many times that I’ve actually now gone on at great length about going on at great length. It’s getting tedious, probably, but I’m stil going to cook a lot of brussels sprouts. That’s because they’re a remarkably versatile little vegetable. Natures handy little brassica nugget, or something. But like a lot of the other things regarding the kitchen and this holiday, I was sort of tired of the same roastedfreidsearedcarmelized sprouts. I was also tired of the “we should have a salad with dinner just in case someone wants some!” despite twenty four straight years of untouched salads ending up in the trash, the compost pile, or with that one inordinately odd guinea pig that for some reason liked French dressing on his lettuce.
So this is both. It’s Brussels Sprouts . It’s a salad. It’s superbrusslessalad. Really, it’s somewhere between a particularly savory slaw and a salad, but it works really well as a salad, and almost even better as a component of a massive plate of Thanksgiving foods – crunchy, savory, vegetal, and less likely to end up in the trash.
Approx. 1 ½ lbs whole brussels sprouts
½ cup pecan halves
4 tbsp gorgonzola cheese pieces
2 pieces thick cut bacon
1 small shallot
1 tbsp olive oil
2 tsp red wine vinegar
1 tsp smooth prepared Dijon mustard
1 tsp fresh ground black pepper
1 tsp kosher salt
¼ tsp granulated sugar
Trim the brussels spouts, cutting away any browned stems or yellowed leaves.
Using a very sharp knife, or a mandolin slicer (with a cut glove) slice the sprouts from end to end into exceptionally thin slices.
Soak the shredded sprouts in two changes of ice water.
Cut the bacon into thin slices.
Fry on medium low heat until the bacon is crisp and the fat has fully rendered out.
Drain the bacon, reserving the bacon fat.
Mix the bacon fat and olive oil.
Peel, trim, and microplane the shallot.
Add the shallot, vinegar, salt, black pepper, and mustard to a large non-reactive bowl.
Allow to rest for 5 minutes, then whisk in the oil/bacon fat mixture.
Drain the sprouts well, and toss with the dressing.
Add the pecans and gorgonzola and toss to combine.
Serve immediately.
Focaccia Stuffing with Bacon and Fennel
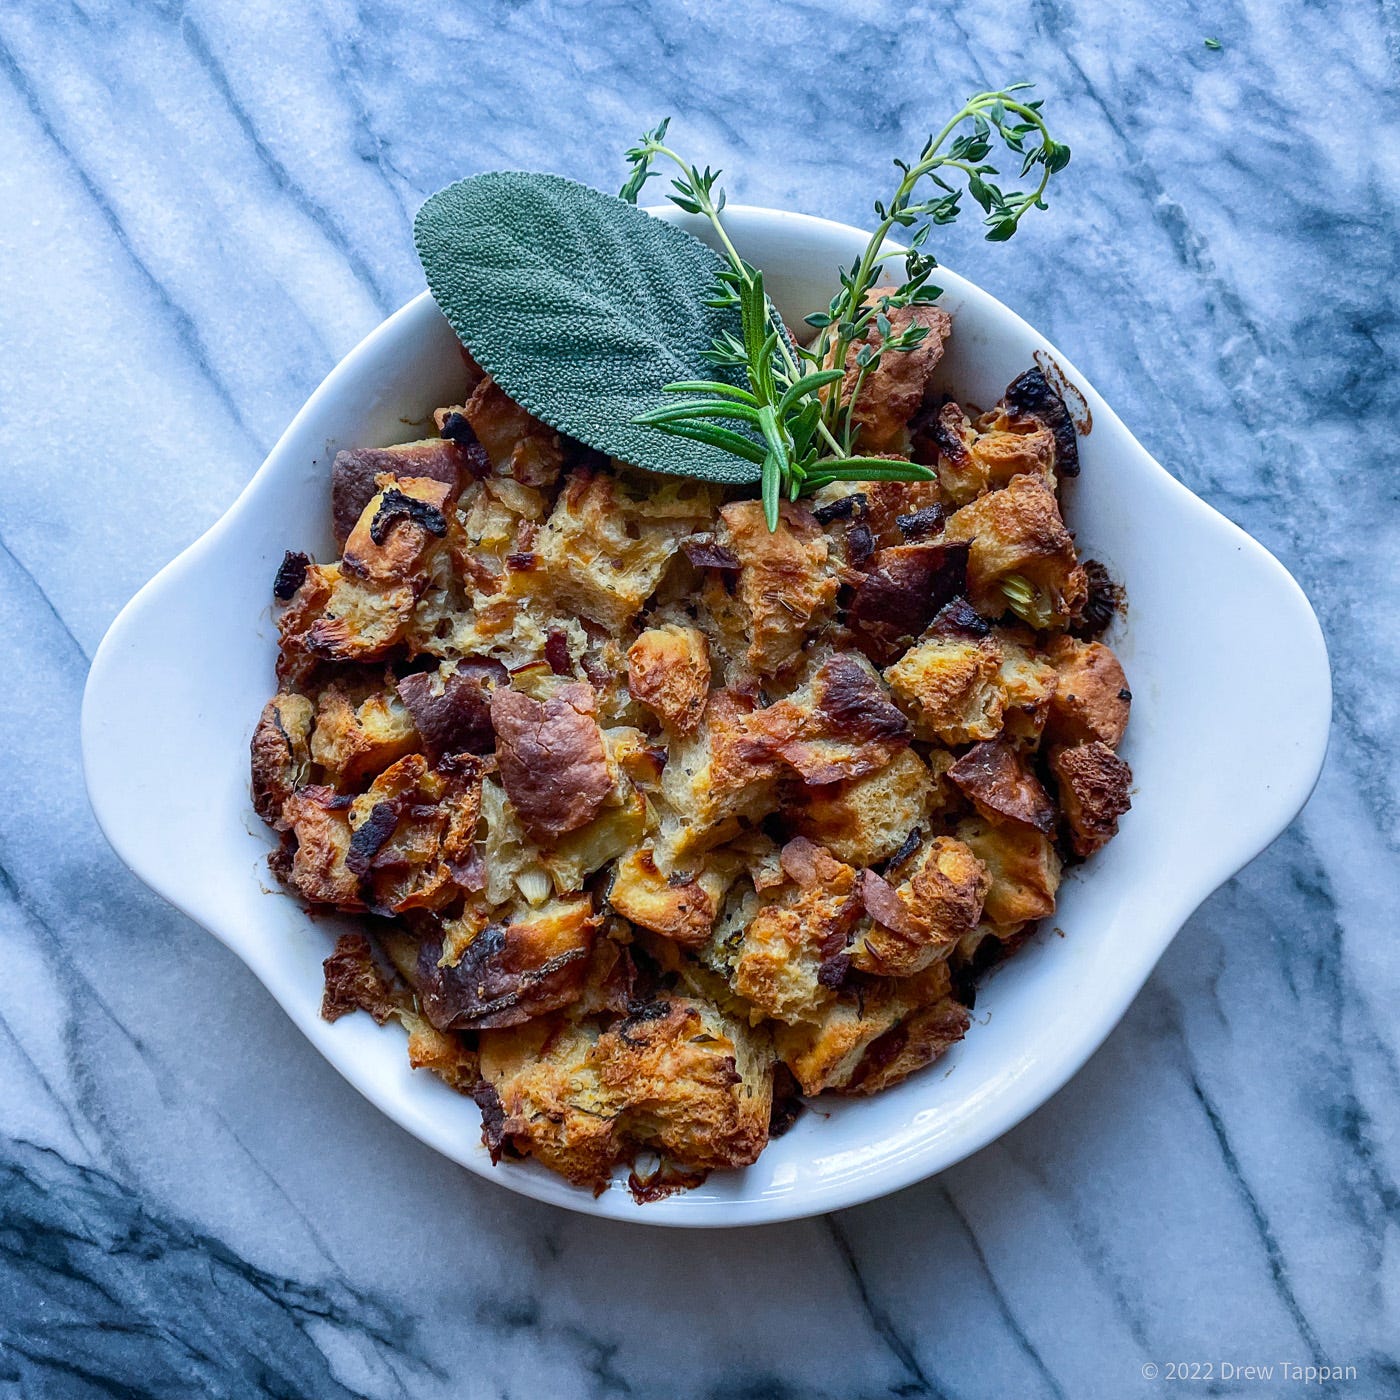
In my mind there’s no thanksgiving without stuffing - so in order to stuck slightly to my italianish theme, I made stuffing with onion focaccia and fennel seeds. The thing is … it’s really really good. That’s it. It’s good.
4 cups focaccia bread cubes (onion or herb prefered)
2 cups smoked turkey stock (below)
2 strips bacon
1 medium onion
1 rib celery
1 tsp kosher salt
1 tsp ground black pepper
1/4 tsp ground fennel seed (ground in a spice grinder)
Peel, trim, and dice the onion.
Trim, and slice the celery.
Slice the bacon into thin strips, and fry until most of the fat has rendered out.
Add the celery, onion, black pepper, and ground fennel to the pan with the bacon and cook over medium heat until the onion is translucent.
Add the stock to the mixture.
Remove from the heat, and add the bread cubes to the stock, folding and tossing to coat evenly.
Preheat your oven to 400°F.
Grease a baking dish with butter, add the stuffing mixture, and bake until the top is crispy.
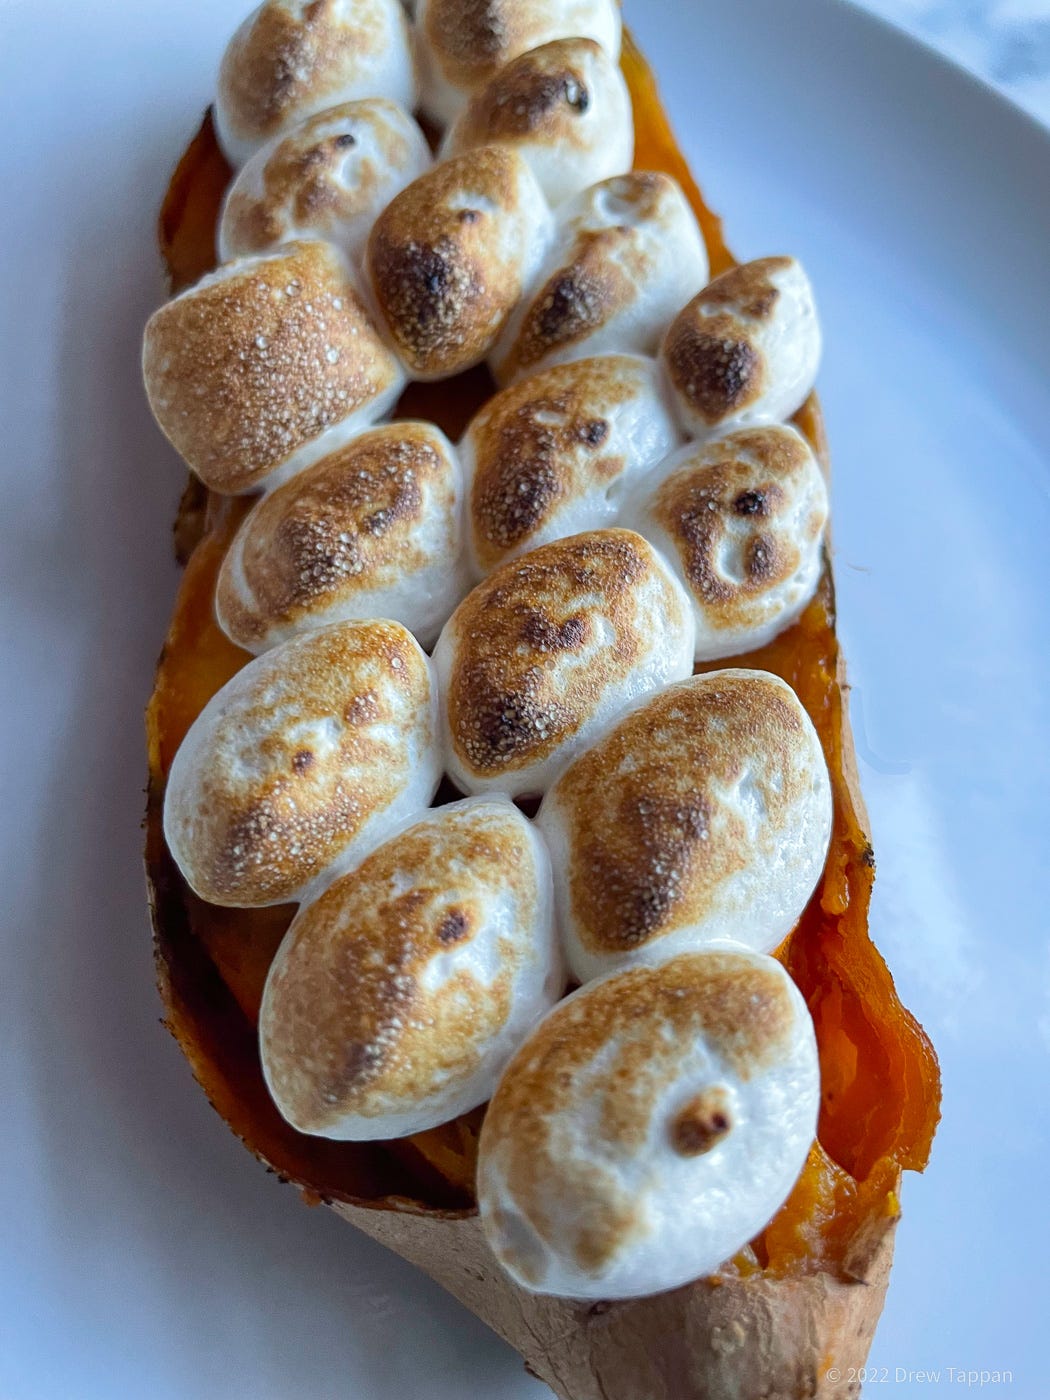
Roasted Sweet Potatoes with Maple Marshmallow Creme
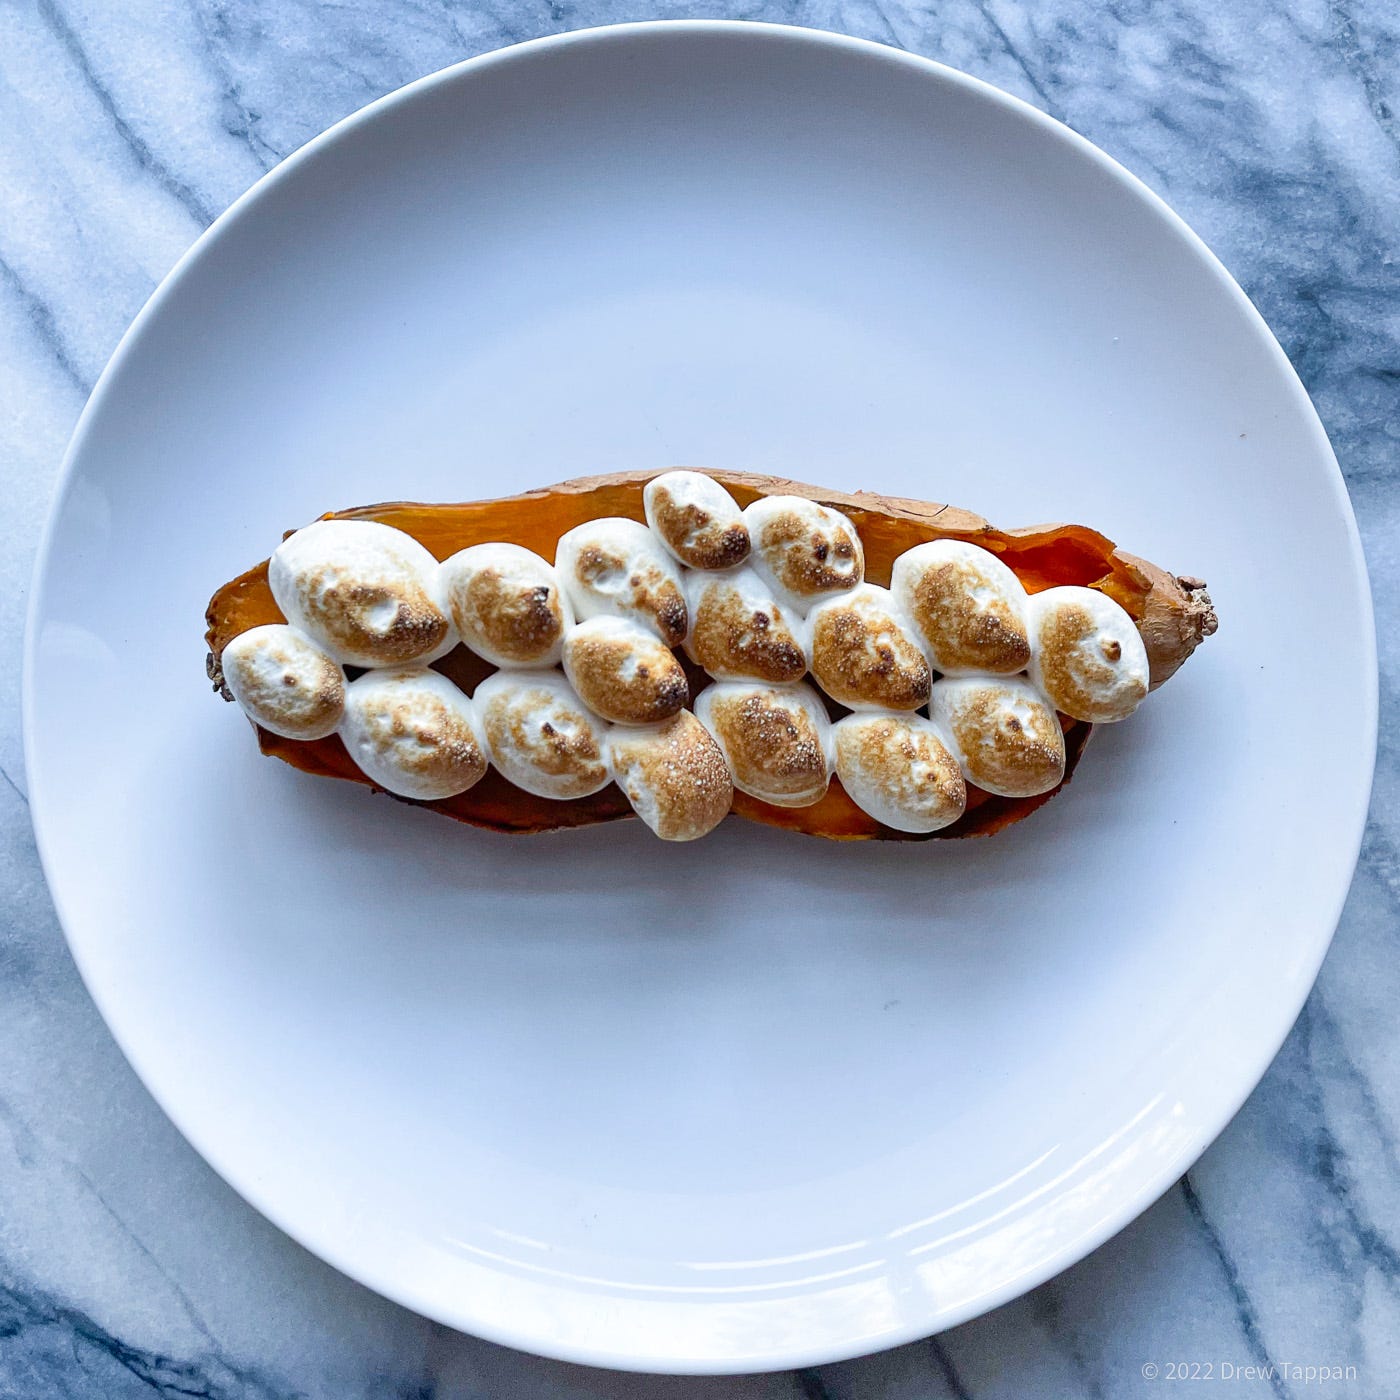
There’s been a lot of talk over the past few weeks about roasting sweet potatoes from a frozen state. I was skeptical – and I’d originally developed this recipe with old fashioned just roasted from whatever temperature the bin in the bottom of the pantry was at on whatever day.
Then I tried it. It works. You get a nice fluffy texture that much less like sweet potato flavored paste than I’m used to. That being said – because this recipe already cooks the potatoes twice, then tops them with delicious marshmallow stuff, then cooks them a tiny little bit again, you may not notice that much difference. Then again, it’s not a whole lot more work either, so why not?
This recipe was my attempt to combine all the old school (marshmallow topping, maple syrup) into one weird new school thing. It works, but a warning, it’s wonderfully cloyingly perfectly rich and sweet. If you’re not serving this as a component of a large mix of savory items – consider dousing it with something spicy and salty, or tangy as an additional garnish – maybe fried chilies in oil, or a drizzle of balsamic vinegar.
Oh, and the maple marshmallow crème that’s a component here … it makes the best fluffernutter you’ve ever had ever anywhere. I won’t have to explain fluffernutter to the New Englanders, but the rest of you can Google ‘em. They’re terrifyingly wonderful.
4 large sweet potatoes
½ recipe Maple Marshmallow Crème (below)
2 tbsp unsalted butter
salt to taste
The night before serving, wash and dry the sweet potatoes and place them in the freezer.
Freeze overnight.
Preheat your oven to 400°F.
Remove the potatoes from the freezer.
Place the sweet potatoes on the center rack, and cook until the internal temperature reaches 195°F 50 mins – 1 hr 15 mins depending on the size of the potatoes
Remove the sweet potatoes and allow to cool to room temperature.
Slice the potatoes into ½ inch thick slices from end to end.
Add the butter to a large frying pan over medium heat.
As soon as the butter has stopped foaming – add the sweet potato planks, and cook until slightly browned and warmed thought.
Arrange on a plate, season with salt, and pipe with maple marshmallow crème.
Use a kitchen torch, or fire briefly under a broiler to slightly toast the marshmallow.
Serve warm
Maple Marshmallow Creme
4 large egg whites
1/3 cup dark amber maple syrup
1/3 cup light corn syrup
1/3 cup granulated sugar
½ tsp cream of tartar
pinch of salt
Add the maple syrup, corn syrup, and granulated sugar to a thick bottomed pan over medium heat.
Do not stir.
Cook until a candy thermometer or high heat instant read reads 240°F – this will usually take about 15-20 minutes.
While the sugar mixture heats, add the egg whites to the bowl of a stand mixer fitted with a whisk attachment. Make certain that the bowl and whisk are both very clean and very dry – this will make the next step faster and easier.
Mix the egg whites on medium speed until just foamy, then add the cream of tartar.
Process on high until stiff peaks form – but be certain to stop before the mixture looks grainy.
Once the sugar has reached temperature, remove it from the heat and allow to cool for 30 seconds or so – then, with the mixer on high speed, slowly drizzle the sugar mixture into the whipped egg whites.
Keep beating the mixture until the bowl cools down – usually 5 minutes or so – and the mixture is fluffly and smooth.
Store covered at room temperature for up to a week.
Cranberry, Pear, and Apple, Chutney
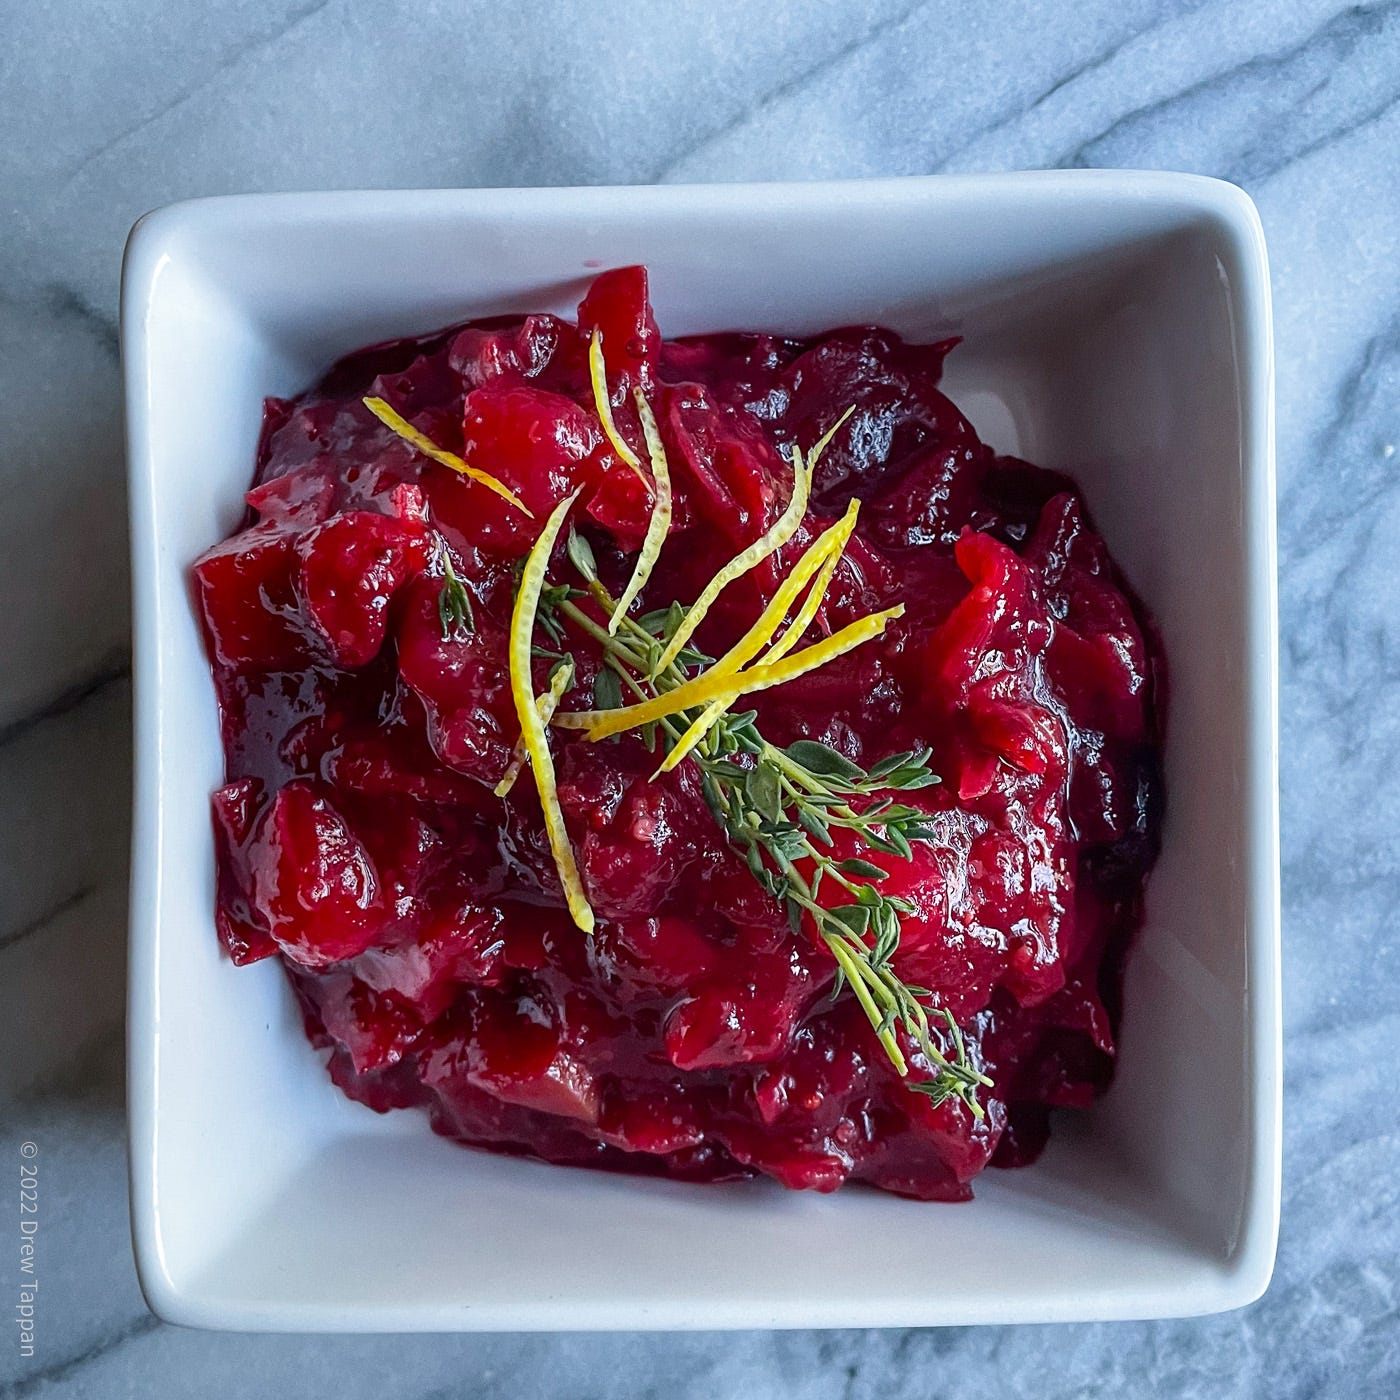
I don’t remember why or when I starTed making my own cranberry sauce. I don’t remember the when because it was a long time ago, and the why must have been something like “I just wanna see if I can” because truth be told I like the stuff in a can. Though I did throw out a can last year that I had apparently moved across the country … more than once.
This is a simple fruit mixture, simply cooked. It’s definitely more than the sum of its parts. It also bears no little or no resemblance to either the stuff in a can, or to the south Asian condiments called Chutney – it just didn’t seem like “sauce” or “relish” did it justice.
8 oz fresh cranberries
1 large Anju pear
1 large Granny Smith Apple
1 cup granulated sugar
1 tbsp minced fresh ginger
1 tbsp julienned lemon zest
pinch of cardamom
pinch of cinnamon
Trim, core, and cut both the pear and the apple into ¼ inch dice. Leave the skin on. It adds texture.
Add the cranberries, sugar, ginger, apple, pear, lemon zest, cinnamon, and cardamom to a thick bottomed pan along with ½ cup of water.
Over medium heat, bring the mixture to a low simmer.
Cook, stirring occasionally, until the cranberries have almost completely broken down and the mixture is reduced in volume by about 1/3.
Allow to cool completely before serving.
Garlic Mascarpone Potatoes
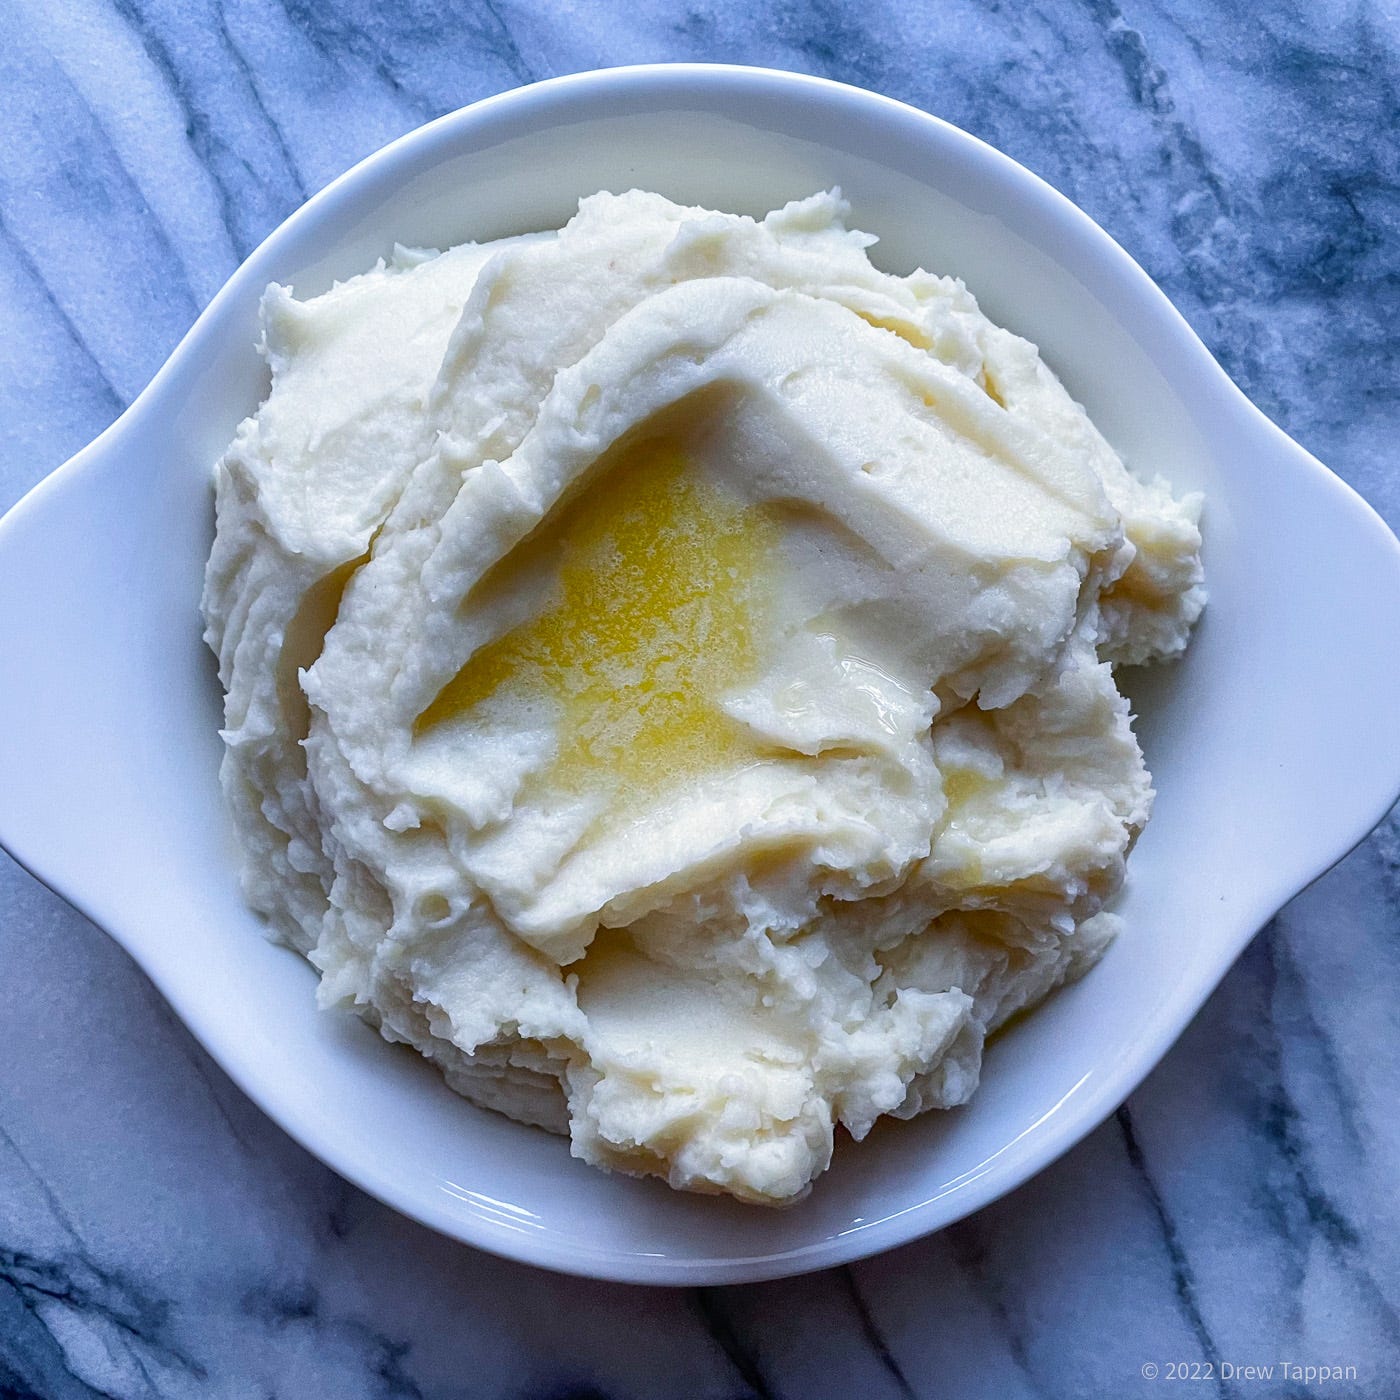
Cheesy, rich, roasted garlic mashed potatoes. These are the perfect evolution of that late 80’s or 90’s … or maybe that happened in the early ‘00s? I don’t remember. Anyway these mashed potatoes are worth the extra work you’ll put into them – even if you go the extra mile and do the extra extra work.
1 ½ lbs russet potatoes
4 tbsp unsalted butter
½ cup mascarpone cheese
1 whole head garlic
1 tbsp olive oil
2 tsp kosher salt, divided
Additional butter to finish
Preheat your oven or toaster oven to 400°F.
Remove the outside papery layers from the head of garlic so that the individual cloves are visible, but still fully attached.
Using a very sharp knife, cut off the top ¼ of the head of garlic.
Arrange a piece of aluminum foil large enough to wrap the garlic head.
Place the garlic in the center of the foil, and season with salt.
Drizzle the garlic with the olive oil, and wrap the foil around it to form a packet – twited or crimped shut at the top.
Place the folk packet on a small sheet pan or in a ramekin, and roast at 400°F for 35 minutes.
Remove from the oven and allow to cool.
Squeeze the roasted garlic and oil from the cloves and set aside.
Peel, trim, and cut the potatoes into 2 inch pieces.
Bring a large pot of salted water to a boil.
Add the potatoes, and return to a boil before reducing to a fast simmer.
Cook until the potatoes are for tender.
Drain the water from the potatoes and add the butter and roasted garlic.
Use a whisk or spatula to work the mixture until the butter is fully incorporated.
Optionally – for the smoothest mixture – pass the potatoes and garlic through a strainer, a food mill, or a tamis. This is a lot of extra work, but the result is luxuriously smooth potatoes.
Whisk in the mascarpone, taste for seasoning, salt if necessary, and serve topped with melted butter. Do not season before adding the mascarpone and tasting – different brands will carry different salt levels, and your taste may vary depending on the sweetness of the cheese.
Turkey Breast Saltimbocca Style
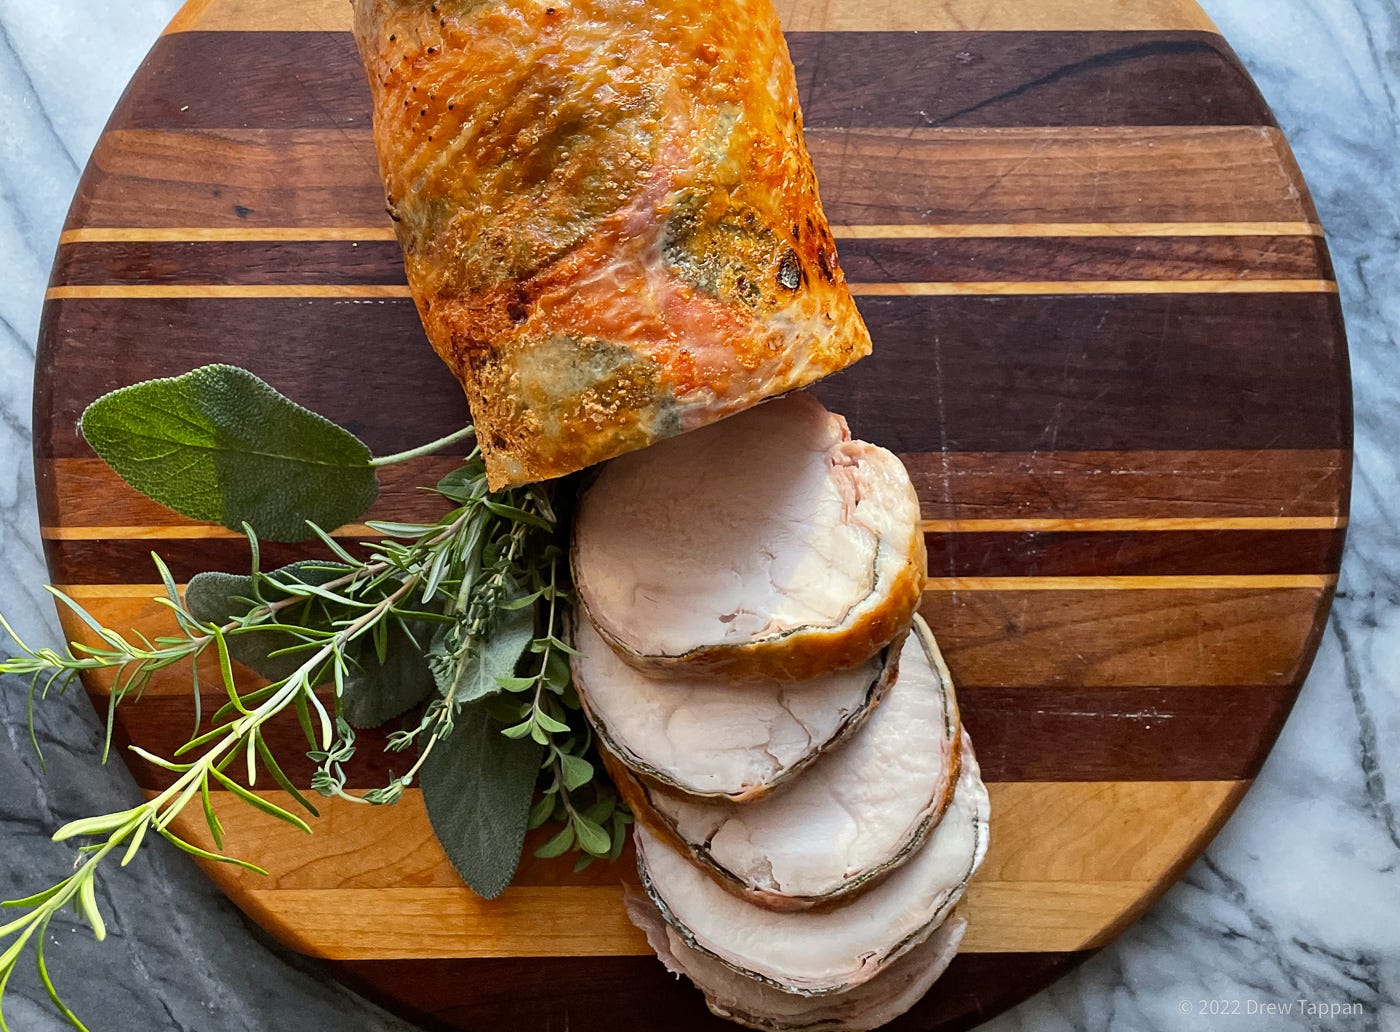
I struggled a bit with what to do for a turkey dish this year. I even thought about making some sort of turkey meatloaf monstrosity that basically combined half the turkey day plate into one composite loaf. That seemed a loaf to far, even for me – though I reserve the right to revisit that travesty at some future date.
I settled, in the spirit of this being a somewhat reduced, but no less festive table, with making a roulade from a turkey breast. I thought about stuffing it with herbs, with buts, with bacon … somehow that that got me thinking about saltimbocca – a northern Italian dish where thin strips of veal are wrapped with or around sliced of prosciutto and fresh sage.
So I wrapped up a turkey with aged dry sage and fresh prosciutto. No, wait that’s backwards. Fresh sage, old ham. Works better that way.
This dish isn’t really complex, but assembling this monstrosity of meatiness does take a little trickery, and a bit of deft hand with a knife. Still, the end result is phenomenal, and best of all – you’re left with a perfectly sliceable sandwich ready preparation that makes leftovers even better.
You can cook this in a normal oven – but if you have a sous vide circulator, it makes rolling and keeping the meat rolled a little easier – and requires tying fewer fussy little knots. I’ve included instructions for both.
4-5 lb bone-in turkey breast
4 oz thinly sliced prosciutto
10-12 large fresh sage leaves
2 tsp kosher salt
Cooking twine
Plastic wrap
Starting at the backbone, carefully remove the skin from the breast in one piece- using a very sharp knife if necessary to cut the membrane connecting the skin to the meat.
Working from the breastbone, and slicing along the ribs, remove the breast meat and tenderloins from the bones. Cut away and discard any thick tendons. Reserve the ribs and bones for stock (below.)
Spread three sheets of plastic wrap, overlapping slightly, on a flat surface.
Spread the turkey skin out on the plastic wrap, with the outside down.
Arrange the sage leaves on the skin.
Arrange the prosciutto pieces on the skin.
Add one boneless turkey breast - cut side up - on top of the prosciutto, and season generously with salt.
Add the second breast – this time cut side down, and with the thicker portion aligned with the thin end of the first breast – on top of the first piece of meat.
Using the plastic wrap as a helper, carefully roll the meat, skin, and fillings into a roll, doing your best to tuck the meat in so that the outer layer only exposes skin.
If cooking sous vide, twist the ends of the plastic wrap tight, to create a tight roll, then seal into a vacuum bag and refrigerate for 1 hour before continuing.
If roasting, carefully peel back about two inches at one end of the plastic wrap and tie up the roll using kitchen twine. Peel back another two inches of plastic, and tie again – repeating until the entire roll is tied tightly in two-inch intervals. Place in a roasting pan or on a rimmed baking sheet lined with a rack, and refrigerate 1 hour uncovered before continuing.
To cook sous-vide:
Prepare a large water bath and set your circulator to 170°F.
Once the bath has reached temp, immerse the sealed roll and cook for 90 mins -2 hours depending on the size.
Preheat your oven to 450°F.
Remove the roast from the bag, remove the plastic wrap and pat dry with a towel.
Arrange the roast in a roasting pan or on a rimmed baking sheet lined with a rack, and transfer to the oven.
Roast just until lightly browned.
Allow to cool slightly before slicing and serving.
To Roast in the Oven:
Preheat your oven to 375°F.
Transfer the tied up roast to the oven and cook, rotating once, until the internal temperature reaches 165°F.
Remove from the oven and allow to rest in a warm, but not hot, place for 20 minutes. The internal temperature should rise to 170°F.
Slice and serve.
Rosemary Smoked Turkey Gravy
This is gravy. Old school, cooked with roux to make it rich and like the stuff from the jar only better and homemade gravy. The only real difference is that I used a smoked turkey neck to make the gravy. It both adds a lot of depth of flavor – and makes a gravy that’s recyclable in more than just “here’s another open faced sandwich!” ways – like for making the poutine I’m think I’m gonna have for lunch today.
½ cup neutral oil
½ cup AP flour
4 cups smoked turkey stock (below)
1 tbsp unsalted butter
2 tsp fresh ground black pepper
1 ½ tsp kosher salt more or less to taste
Bring the turkey stock to a low simmer.
Add the oil and flour to a thick bottomed pan over medium heat.
Cook, stirring constantly with a flat bladed wooden spoon or silicone spatula, until the mixture is a dark peanut butter color roux and smells very toasted.
Add the roux to the simmering stock, and whisk to combine.
Continue to simmer, stirring occasionally, until the mixture has reduced by half and the roux has thickened the gravy.
Whisk in 1 tbsp unsalted butter.
Season with salt and add pepper just before serving.
Smoked Turkey Stock
1 smoked turkey neck
1 turkey breast carcass (from above)
1 large carrot
1 large onion
2 ribs celery
1 bay leaf
1 tsp whole peppercorns
Broil the turkey breast bones until well browned.
Add the turkey breast bones, the smoked turkey neck, and all other ingredients to a large pot with enough water to completely cover.
Bring to a simmer, and cook for 2 hours.
Strain though a very fine strainer or flour sack towel.
Refrigerated or freeze until needed
Spiced Apple Dumplings with Anise Whipped Cream
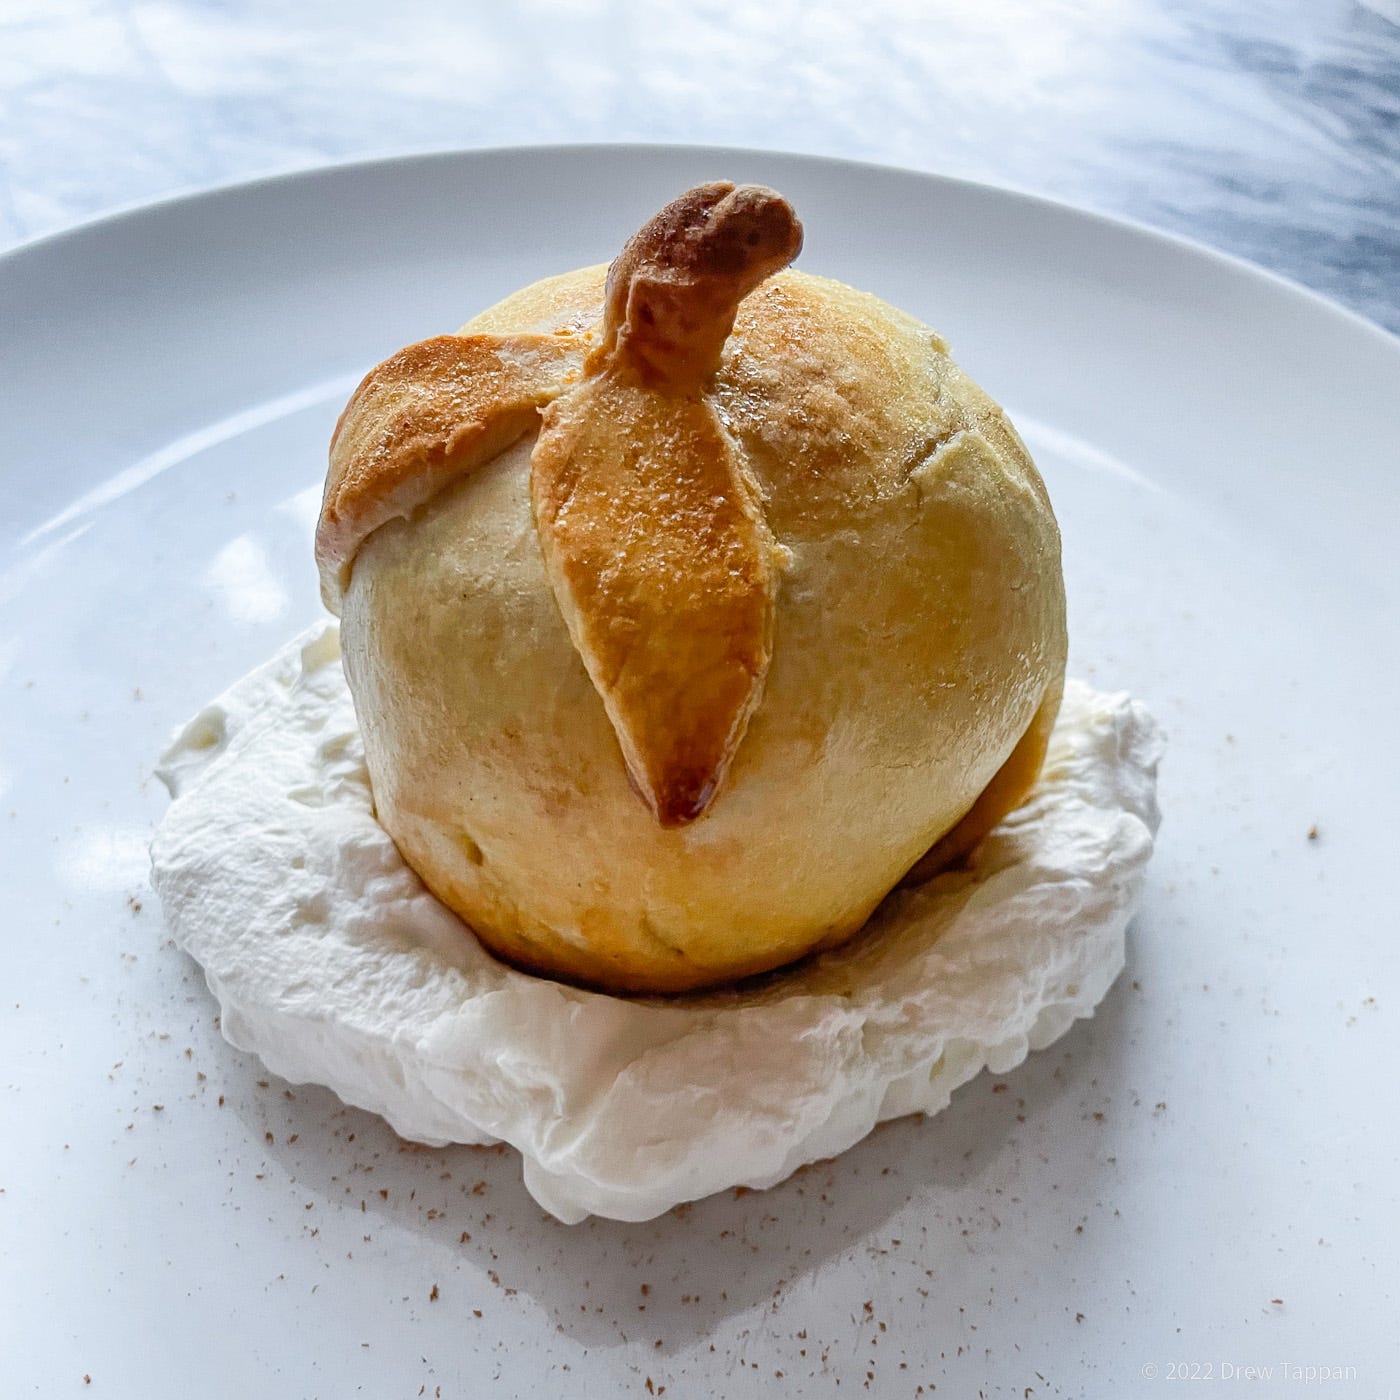
Think of these as exceptionally fussy individual apple pies. Except in some ways their a lot less fussy than an actual pie. You just stuff some peeled, cored apples with some stuff, and wrap ‘em up. In my mind that’s a lot easier than lattice top pies or trying to make the edge of the crust not look like a giant thumbprint – but that’s mostly because I have large clumsy hands and don’t really like pies.
4 small granny smith apples
1 recipe pastry
1 recipe filling
1 egg
2 cups whipping cream
1 tsp anisette such as Pernod, or Absinth
Whisk the whipping cream until soft peaks form.
Add the anisette, and whisk until stiff peaks form.
Refrigerate until ready to use.
Preheat your oven to 350°F.
Peel, trim, and core the apples.
Roll the pastry out into 4 circles approximately twice as large as the apples, and about 1/8 thick.
Roll the apples in the filling, so a small amount sticks to the outside.
Place the cored, peeled apples at the center of the pastry circles.
Fill the empty core with the filling.
Gently pull and fold the pastry around the apple, stretching and layering the pastry at the top to seal.
Turn the apples over, and place on a greased sheet pan.
If so desired, add pastry pieces cut to look like leaves and a stem.
Whisk the egg with a little water, and brush the pastry with egg wash.
Bake at 300°F until the pastry is a golden brown.
Spread anise whipped cream on a place, and top with the baked pastry wrapped apple.
Spiced Apple Filling
4 Tbsp melted unsalted butter
4 tbsp dark brown sugar
4 tbsp raisins
4 tbsp chopped walnuts
½ tsp kosher salt
1 tsp cinnamon
½ tsp cardamum
1 pinch ground cloves
Combine all ingredients.
Pastry
3 cups AP flour
8 tbsp plus 4 tbsp unsalted butter
3 tbsp granulated sugar
¼ cup water
In the container of a food processor, combine the flour, 3tbps of granulated sugar, a pinch of salt, and 8 tbsp of unsalted butter cut into small cubes.
Pulse until a fine crumb has formed.
With the food processor running, slowly add the water.
Stop the food processor, and check the dough consistency. If it can be formed into a solid dough, you’re done. If still crumbly, add more water 1-2 tsp at a time until you can shape it into a smooth dough.
Turn the dough out onto a surface and knead just until a smooth dough forms.
Shape into 4 even disks, and wrap in plastic.
Allow to rest in the refrigerator for 30 minutes before using.